All,
I'm sorry to say but I'm not able to participate. I couldn't figure out how to remove my link from the site.
With sincerest appologies!
Rachelle
Saturday, October 1, 2011
Tuesday, August 30, 2011
Another Scramble... more fun
Good Morning,
This weekend has been busy for me. I was able to squeeze in another Hero Arts Quick Card scramble. I find these so much fun. This time I used the time to make a birthday card for my best friend. I can't believe how easy the design came to me.

This weekend has been busy for me. I was able to squeeze in another Hero Arts Quick Card scramble. I find these so much fun. This time I used the time to make a birthday card for my best friend. I can't believe how easy the design came to me.
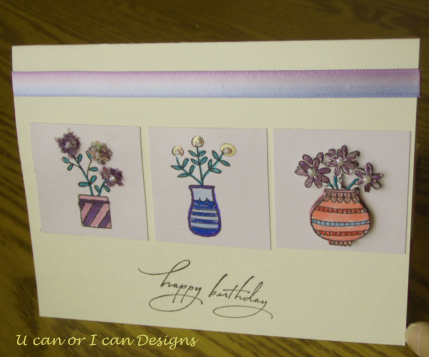
The photo doesn't do this card justice. It came out really nice in person.
The challenge this time was to use either your oldest or newest Hero Arts stamp. This was Hero Arts Vase Trio. I hadn't even used it yet.
So I stamped each one on a 2 X 2 piece of white card stock. (I wish I would have inked them around the edges). I wanted each one to be a done a little different. So starting from left to right.
For the left vase I used flower soft on each of the flowers. I haven't worked with this medium in a while and I think I need to go back and practice more. I added some Viva Pearl Pen for the flower centers. Then used copics and marvy markers for the vase.
For the center vase I used gel pens that sparkled and center once again used the Viva Pearl Pen. Again using copic and marvy markers for the vase.
The vase on the right. I stamped twice. One I cut out. I colored them both the same. Using sparkle gel pens. Then I pop dotted the one I cut out on top of the stamped image. Again I used Viva Pearl Pen for the centers.
The ribbon is verigated in color of purple and blue to match the color schemes.
Happy Birthday stamp from Stampabilities.
The scramble was so much fun. Thanks Judy for hosting!
Sunday, August 28, 2011
Male Birthday Card
Hi everyone!
Hope you have had great and safe weekend.
A created this card from a stamp I received from Of-the-Heart. I did it with subtle colors, I plan to be using this stamp for a few more cards. It really is very versatile.
 I am almost embarrassed to post this. I promise it looks much better in person. I of course took the picture, didn't look at it and left to give him his card. So no retake's.
I used water color pencils. I also used glaze on the some of the flower centers and some of the spots on the butterfly to make them pop.
Wishing everyone a wonderful Week!
Hope you have had great and safe weekend.
A created this card from a stamp I received from Of-the-Heart. I did it with subtle colors, I plan to be using this stamp for a few more cards. It really is very versatile.

I used water color pencils. I also used glaze on the some of the flower centers and some of the spots on the butterfly to make them pop.
Wishing everyone a wonderful Week!
Sunday, August 21, 2011
Michael's Crop Night
Tonight was crop night at Michael's. Tal and I had a great time. Take a look at some of the projects she completed today! It was so much fun helping her. They turned out wonderful.


This is her 3 beautiful children. This was a quick and fun project. She used Martha Stewart Punch Around The Page punch set to create the border around the mats. The background is from a beautiful set of paper's she had previously purchased. The frames were on clearance at Michael's. A whopping $2.99 each. Now she has 3 beautifully framed pictures of her children to hang up in her home.
Look at this project! She made this to hang in her daughter's room. This turned out so cute!

This project was simple and quick too. The first thing you need to buy is the 3 mat frames. These are the card board type that you normally put inside a frame. Then she chose a background paper. She chose pink to match her daughter's room. We inked the frames inside and out with a dark brown. The little girls are from the Cricut cartridge - Paper Doll Dress Up. She made the Princess, Ballerina and the hula girl. To add some additional dimension, she pop dotted them so they stood out a little. Then to connect the frames she chose a pink ribbon a little over an inch wide. By leaving a small space when gluing down the back ground she was able to thread the ribbon through. We then secured it down. Then we used the same ribbon to create a hanger by attaching it to the back of the top picture. To finish it off she added 3 dimensional butterflies on top of the ribbons.
Saturday, August 20, 2011
90 Minute Hero Arts Scramble
I have had an amazing day today. I started the morning off working on some demo items for new Cricut classes I'll be teaching. I also am testing out new Cricut software, so it's been a fun morning. Then at 11:AM on the Hero Art Flickr we had a 90 minute scramble.
What is a 90 minute scramble?????
A hostess chooses the time and describes a challenge and you have 90 minutes to complete it. Marcy hosted today and did a wonderful job! What was the challenge??? You had to use one Hero Arts stamp and the small filler stamps that come in a larger clear set.
It was a lot of fun. My results is below:

The Hero Arts Stamp I used was the F3246 Fancy Fillament. (the stem for the flower). The smaller stamps I used were from an Inkadinkado set # 98692. The Happy Birthday stamp is from Stampabilities #FR1040. You can't see it but on the outline of the butterfly I used Smooch.
Monday, July 18, 2011
Happy Monday!!!
Good Morning,
Well I did do some crafting this week, just don't have any pictures to show. :-( I'm sorry.
However, what I do have to share with you is a wondeful mini album that was made by another lady that is on a forum I frequent. Her work is fantastic.
Now I don't know about you, but when I hear the word album, I automatically start thinking photo album. Well this isn't a photo album. That's what is so exciting about this project. Helping to inspire and stretch us outside the creativity box.
Well with out further delay click on the link below.....
Finding Time To Create
Is this not the cutest!
![]() Stop by and leave a comment for Krafting Kelly. Tell her I sent you. :-)
Stop by and leave a comment for Krafting Kelly. Tell her I sent you. :-)
Have a wonderful day and a blessed week!
Well I did do some crafting this week, just don't have any pictures to show. :-( I'm sorry.
However, what I do have to share with you is a wondeful mini album that was made by another lady that is on a forum I frequent. Her work is fantastic.
Now I don't know about you, but when I hear the word album, I automatically start thinking photo album. Well this isn't a photo album. That's what is so exciting about this project. Helping to inspire and stretch us outside the creativity box.
Well with out further delay click on the link below.....
Finding Time To Create
Is this not the cutest!

Have a wonderful day and a blessed week!
Friday, July 15, 2011
Christmas in July
Happy Friday Friends!
So as some of you know I work for Micheal's as a scrapbook instructor. Well we got a new store manager and he is awesome!!! He asked me to do some displays for the store from their Christmas in July project sheets. Here is the bag I made. He told me I didn't have to follow the project sheet, but I need to make the project. Here is what I did.:
![]() Supplies:
Supplies:
Stamp: Recollection North Pole set (reindeer)
Ribbon - this was just some red and silver ribbon Michael's had in their Christmas section
Embossing powder - Here I used detail. Read on why I wish I hadn't.
Paper is from Brazzil's (I think) -- note to self get better about tracking exact supplies
White card stock
Markers - I used momentos this time around
Ink: Versa Fine - Black and Tim Holtz distress ink - Antique Photo
Ribbon - the red snow flake ribbon I bought when JoAnn's was clearing out Christmas stock last year.
Plain Gift bag.
EK Success Circle cutter - love this little gem!
Heat emboss tool
Instructions:
I measured the bag space for the size to cut the snowflake paper. It was 7 3/4 X 5 1/4.
Then I took a piece of White card stock and stamped my reindeer. (Now so I would have extra reindeers and since I was already inked up, I stamped 4 on the 8 1/2 X 11 sheet of card stock. I stamped them using the Black Versa Fine ink. This is my favorite go to ink pad.
With my stamping coming out so clear I made sure I set it aside for a few minutes and made sure it was dry before I began coloring.
I cut two of them out in a 4" circle. (A 4" inch circle around each reindeer). The other two I set aside to cut out later. I will probably cut out the actual reindeer shape once I color them in. But that will be another day.
For this project I only used one of the circle cut reindeer's. I color him in with markers. I chose Memento markers. I have several different types of markers and depending on color I want to use, or technique I choose a marker. I colored him in, in the white areas, I simply left it uncolored. With the embossing over him, he looks fine. Again I set him aside to make sure he dried and wouldn't smear.
OK, now I took my embossing stamp pad and stamped all over my reindeer image. I then took my embossing powder and covered my image. I did this over a sheet of paper, so I can easily put the excess back in the jar. If you do it over your craft sheet, it tends to stick and it's an extra mess to clean up. Now I picked it up with my tweezers and using my heat tool I melted the crystals for my first layer. You know it's ready when the image comes through clear with vivid colors. However, make sure you go over the non-color area too. I repeated this process for about 5 or 6 layers.
Why you ask... well this is the part where I tell you I wish I hadn't used fine embossing powder. I was planning on doing a cracked glass technique and only had fine embossing powder. I thought oh this will work the same just probably have to do extra layers. OK, not that simple and lost my interest in layering quickly. :-) Still I continued on. I put my project in the freezer to help with cooling off and was hoping my paper would curl more so I would get some good cracks. Again ---- don't use fine embossing powder.
Next step. I took it out of the freezer and proceeded to crack it. It did OK, but not the look I was going for, it was more subtle. The great thing about art, you can make it look like it wasn't a mistake! :-) So now I got out the distress ink and with a make up sponge wiped it over the embossed image. Trying to pull out some of the cracks. In real life the cracks are a little easier to see than in the photo.
Oh what I didn't tell you was that with my first layer of embossing ink the paper seem to thin and I didn't like that look at all. It made it look messy with the blue paper behind it. Thus was my next step came into the picture. I cut another piece of white card stock to put behind the image. Everything that was suppose to be white was white again. :-) Glued it on the diagonal and trimmed with ribbon. I attached my ribbon with my tape runner. Then tied the handles with the red snowflake ribbon to bring out a little more of the red in the project.
Time to get going on your Christmas projects. I would love for you to share with me!
So as some of you know I work for Micheal's as a scrapbook instructor. Well we got a new store manager and he is awesome!!! He asked me to do some displays for the store from their Christmas in July project sheets. Here is the bag I made. He told me I didn't have to follow the project sheet, but I need to make the project. Here is what I did.:

Stamp: Recollection North Pole set (reindeer)
Ribbon - this was just some red and silver ribbon Michael's had in their Christmas section
Embossing powder - Here I used detail. Read on why I wish I hadn't.
Paper is from Brazzil's (I think) -- note to self get better about tracking exact supplies
White card stock
Markers - I used momentos this time around
Ink: Versa Fine - Black and Tim Holtz distress ink - Antique Photo
Ribbon - the red snow flake ribbon I bought when JoAnn's was clearing out Christmas stock last year.
Plain Gift bag.
EK Success Circle cutter - love this little gem!
Heat emboss tool
Instructions:
I measured the bag space for the size to cut the snowflake paper. It was 7 3/4 X 5 1/4.
Then I took a piece of White card stock and stamped my reindeer. (Now so I would have extra reindeers and since I was already inked up, I stamped 4 on the 8 1/2 X 11 sheet of card stock. I stamped them using the Black Versa Fine ink. This is my favorite go to ink pad.
With my stamping coming out so clear I made sure I set it aside for a few minutes and made sure it was dry before I began coloring.
I cut two of them out in a 4" circle. (A 4" inch circle around each reindeer). The other two I set aside to cut out later. I will probably cut out the actual reindeer shape once I color them in. But that will be another day.
For this project I only used one of the circle cut reindeer's. I color him in with markers. I chose Memento markers. I have several different types of markers and depending on color I want to use, or technique I choose a marker. I colored him in, in the white areas, I simply left it uncolored. With the embossing over him, he looks fine. Again I set him aside to make sure he dried and wouldn't smear.
OK, now I took my embossing stamp pad and stamped all over my reindeer image. I then took my embossing powder and covered my image. I did this over a sheet of paper, so I can easily put the excess back in the jar. If you do it over your craft sheet, it tends to stick and it's an extra mess to clean up. Now I picked it up with my tweezers and using my heat tool I melted the crystals for my first layer. You know it's ready when the image comes through clear with vivid colors. However, make sure you go over the non-color area too. I repeated this process for about 5 or 6 layers.
Why you ask... well this is the part where I tell you I wish I hadn't used fine embossing powder. I was planning on doing a cracked glass technique and only had fine embossing powder. I thought oh this will work the same just probably have to do extra layers. OK, not that simple and lost my interest in layering quickly. :-) Still I continued on. I put my project in the freezer to help with cooling off and was hoping my paper would curl more so I would get some good cracks. Again ---- don't use fine embossing powder.
Next step. I took it out of the freezer and proceeded to crack it. It did OK, but not the look I was going for, it was more subtle. The great thing about art, you can make it look like it wasn't a mistake! :-) So now I got out the distress ink and with a make up sponge wiped it over the embossed image. Trying to pull out some of the cracks. In real life the cracks are a little easier to see than in the photo.
Oh what I didn't tell you was that with my first layer of embossing ink the paper seem to thin and I didn't like that look at all. It made it look messy with the blue paper behind it. Thus was my next step came into the picture. I cut another piece of white card stock to put behind the image. Everything that was suppose to be white was white again. :-) Glued it on the diagonal and trimmed with ribbon. I attached my ribbon with my tape runner. Then tied the handles with the red snowflake ribbon to bring out a little more of the red in the project.
Time to get going on your Christmas projects. I would love for you to share with me!
Thursday, July 14, 2011
Diaper Cake
Hi Everyone!
Has it ever felt like things are really falling into place. That is how I have been feeling lately. God has really blessed me.
In the previous posting I showed you a baby shower card I made. Well here is the diaper cake I made to go with it. I remember last time I made one it took me several hours, this time it went really quick. Feels like I forgot a step, but it turned out really cute.
![]()
![]()
Has it ever felt like things are really falling into place. That is how I have been feeling lately. God has really blessed me.
In the previous posting I showed you a baby shower card I made. Well here is the diaper cake I made to go with it. I remember last time I made one it took me several hours, this time it went really quick. Feels like I forgot a step, but it turned out really cute.


The topper is an item that was on her registry and I just loved what it added to the cake.
So how did I do it???
Contains:
1 - box of Size 1 96 count diapers
various small items from registry
3 types of ribbon.
1 - curling ribbon
1 - 1" size
1 - 3/4" size
1 baby bottle
Optional - candy to fill baby bottle
Plastic cake platter
Tape
Rubber bands
Glue Dots
I used the same size diaper for all layers. (previously I have used different sized from new born to size 3. Each layer getting a different size diaper) However, my niece recently had a baby and even though she got a boat load of diapers, she still had to buy new born and size 1. So I chose to do this cake with all size 1 diapers.
What I'm not sure of is the # of diapers I used. I bought a box of 96 and did not use the whole box. I would guess around 50 or 60. I rolled each diaper up and secured it with a rubber band. One thing I recommend when rolling is to roll to the folded part of the diaper. I found that it made each diaper more uniform and the ends came out flatter.
I purchased a plastic cake platter from the dollar store as my base. The center was a baby bottle. For an added touch I filled it with candy. I really should have used two bottles, but being a procastinator I didn't have any time left to go get another one. The taller your cake the taller your center piece needs to be. You don't have to use a bottle. You could use a sturdy papertowel empty roll, gift wrap roll, alumnin foil roll, you get the idea. :-) What ever you choose to use, you need to secure it to your base. I used tape and strong glue dots. (The new elmer glue dots I think are really strong)
Once all of your diapers are rolled and you have your center secured you are ready to start assembly. Take about 5 or 6 diapers and surround your middle base piece. (the baby bottle or what ever you are using). Then secure them all together with another rubberband. Now surround those diapers with another layer of rolled diapers. Now at this point I didn't have a large enough rubber band to put around this wring of diapers, so I tied curling ribbon around them tightly. You now have your base layer of your cake. You will repeat this process all the way to the top tier.
Once you have all the tiers of diapers you want it's time for the icing a.k.a. ribbon and registry items. In my example I took the 1" ribbon (Plain Purple) and wrapped it around each layer of diapers. Then I took the 3/4" ribbon (Pink and says It's a Girl) centered it on top of the plain purple. Then I used the purple curling ribbon to help secure various items on to the cake. The 1st purse I just took one of the attachments and slid it into the ribbon and it held nicely. (Make sure that you put each ribbon layer on tight to prevent slipping and so it can hold items.) Because I didn't like seeing the seams, I used curling ribbon and secured two teathing ring type toys over the seams. Add the curl for a little more punch. I had two rattles that fast to a baby's arm or leg with velcro. I just attched them around the ribbon.
For the topper I used a baby security blanket my friend had registered for. Then for some extra decorations I added a few barrettes clipped around.
Well I can barely hold my eyes open, so I'm off to sleep land and hope to post more tomorrow!
Good Night and God Bless!
Sunday, July 10, 2011
Vintage Birthday
Hi,
I'm still working on keeping this blog updated on a regular basis. I do love crafting, sometimes I just over committment myself. Can you be addicted to stress? I think sometimes I like chaos, just so I can figure a way out.
Well enough of me... On to this posting's project.
Yesterday I did a Hero Arts 90 minute scramble challenge. See the Hero Arts Flickr site for upcoming scrambles. They are addicting!!!
THE CHALLENGE
1) Your new creation must contain at least one side without a straight edge.
2) Use your favorite Hero Arts stamp(s).
3) Use your favorite color combination.
4) Use your favorite technique(s).
5) Use your favorite embellishment(s).
The hostest with the mostest had some wonderful examples. Below is my entry:
It's a card for a Baby Shower I was going to later that day.
![]() This card is in the shape of a Onesie. It was cut using my Silhouette SD. I used a Hero Arts Butterfly digital cutting file for the butterfly. The background stamp is an old Hero Arts trio butterfly set.
This card is in the shape of a Onesie. It was cut using my Silhouette SD. I used a Hero Arts Butterfly digital cutting file for the butterfly. The background stamp is an old Hero Arts trio butterfly set.
Now I had also began working on a second design during this scramble (high hopes I could do two cards in 90 minutes --- let's just say I'm still striving to hit that goal.) This card was for a dear friend's mother's 83rd birthday. She threw her a party with a roaring 20's theme. That is where I got the inspiration for the design.
![]() This card was so fun to make. The card base I used black card stock and cut the design from Silhouette. Then the silhouette of the vintage woman is a Hero Arts design.
This card was so fun to make. The card base I used black card stock and cut the design from Silhouette. Then the silhouette of the vintage woman is a Hero Arts design.
I'm still working on keeping this blog updated on a regular basis. I do love crafting, sometimes I just over committment myself. Can you be addicted to stress? I think sometimes I like chaos, just so I can figure a way out.
Well enough of me... On to this posting's project.
Yesterday I did a Hero Arts 90 minute scramble challenge. See the Hero Arts Flickr site for upcoming scrambles. They are addicting!!!
THE CHALLENGE
1) Your new creation must contain at least one side without a straight edge.
2) Use your favorite Hero Arts stamp(s).
3) Use your favorite color combination.
4) Use your favorite technique(s).
5) Use your favorite embellishment(s).
The hostest with the mostest had some wonderful examples. Below is my entry:
It's a card for a Baby Shower I was going to later that day.

Now I had also began working on a second design during this scramble (high hopes I could do two cards in 90 minutes --- let's just say I'm still striving to hit that goal.) This card was for a dear friend's mother's 83rd birthday. She threw her a party with a roaring 20's theme. That is where I got the inspiration for the design.

Sunday, February 6, 2011
Valentine Cards
I've created a few valentine cards I can't wait to share with you.
 I loved how this card turned out. The words are from a Silhouette file cutout. The silver love and heart is a chain sticker, unfortunately I'm not sure who it is made by. The heart and key are from Dress It Up Victorian Treasures. Love these buttons! The background paper is from DCWV Once Upon a Time paper pack set.
The second card I did was for a friend of mine:

 This card I started out a little differently. I started out with the pink top piece of paper. I like the muliple lines in this paper pack page. I then built on the colors within the topper. It had dark brown and blue stripes. The following supplies were used:
The last valentine I will post today I did for a Valentine exchange for Hero Arts Flickr group. Check them out you will see some great work and these ladies are so much fun! Hero Arts Group
 With the Hero Arts group it's about using Hero Arts products. So the diecut in the middle, is a file I cut using my silhouette. The file was made by Hero Arts. I used Martha Stewart's border punch to get the lace look on the paper. The pink hearts are stickers that I got in the dollar bin at JoAnn's. The Happy Valentine's Day stamp is a dollar stamp by Hampton Arts.

The second card I did was for a friend of mine:

For this card I took a 8 1/2 by 11 white card stock and cut it in half. Then I used Martha Stewarts scoring board to frame the card. Then I used some scrap pink paper. Using a stamp by Hampton Art. Love these dollar stamps. I first used a anti-static pillow to wipe over the surface. The purpose of this is so that the embossing powder doesn't stick to anything but where I stamp it. I then stamp the in Versamark embossing ink onto the paper. Then I put Sweet Stamps white embossing powder generously over the stamped area and knocked off the excessed. Then using a heat embossing tool I heat up the embossing powder.
There is a embossed heart next to the words, but I wanted more punch. So I used a heart sticker by Sticko. Then on just the pink paper I pierced holes in each corner and added a small white heart brad. These brads were by Marvy. I then cut off one of the brad legs that stuck out over the edge. I used small Zots to attached the pink paper.
To add a little more color I used a q-tip and chalked the score lines around the card. I liked the add of color, but think next time I will ink it.
Another card I made for Valentine:

- DMD paper pack
- VersaFine - Onyx Black
- StazOn - Timber Brown
- Copic - Tender Pink RV13
- Copic - Frost Blue B00
- Jellyroll - #720
- SandyLion - heart stickers
- Craftsmart - flower hearts
- Hampton Art - Happy Valentine Day
- Brown ribbon
The last valentine I will post today I did for a Valentine exchange for Hero Arts Flickr group. Check them out you will see some great work and these ladies are so much fun! Hero Arts Group

Monday, January 31, 2011
I'm back and going to stay more focused
Have you ever bitten off more than you can chew. Well for me that is often a natural state. I'm beginning to think I like all that stress. (whew... that was a fleeting moment of insanity) :-)
So what was I up to while I was away. Working too many jobs, holidays, family and relationships. The good news is that I survived, paid cash for Christmas, and enjoyed the holidays with family and friends!
I am so excited to get going on this blog and take it more serious. As part of this I have taken the EKSuccess training classes and have become a certified trainer for their scrap booking classes. I'm so excited. I teach my first class at Michael's on Feb. 8th. Now to get customers excited about taking it.
So where are more pictures and updates... those will be coming real soon. I made some valentine cards that I will be sharing this week. I had fun making them. I will say this, I started out with a completely different idea then what I ended up with!
Hey have you heard about the Spotted Canary? http://www.spottedcanary.com/
Great new website that was launched. And if you are lucky enough to get the PBS channel they have a crafting show. Take a look around!
Since it is February, it's what I call the Love month.
So I'll end today's post with a verse about love:
Mark 12:30-31:
Love the Lord your God with all your heart and with all your soul and with all your mind and with all your strength.' 31 The second is this: 'Love your neighbor as yourself.' There is no commandment greater than these.
Till we meet again! :-)
Subscribe to:
Posts (Atom)